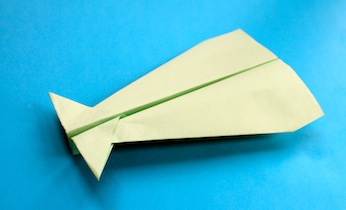
How to make a flying fox paper plane
Making paper planes is a simple paper craft activity for kids that lead to lots of fun outdoors as they fly their paper planes. This flying fox paper plane design is based on the flying properties of a bat: its big ears give it greater lift.
What you need:
- 1 x A4 sheet of paper
Number of players:
1+
Activity:
Start with the classic paper plane fold: fold the piece of paper in half lengthways, open it out. Then fold each top corner to the centre crease.
Now fold each side to the centre again.
Open out the left side.
Re-fold the left side as follows: fold in the crease closest to the centre, then create a backwards flap with the other exisiting fold (see video).
Do the same on the right side.
Flip it over so the blank side is facing up.
Now fold the top point down, matching up the two triangle shapes.
Fold the whole thing in half lengthways.
Now create wings and a fuselage by folding each top layer over, leaving about 2.5cm for the fuselage.
Pop out the wings.
Use your finger to puff out each 'ear' at the front to give your flying fox extra lift.
- Thanks to our sister company Kidspot Australia for creating the instructional video.


Leave A Comment
You must be logged in to post a comment.