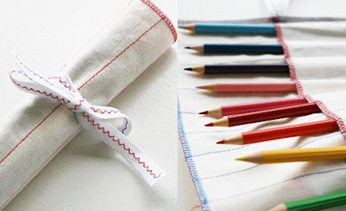
Make a pencil roll in 10 minutes
This pencil roll is an easy project to introduce kids to supervised sewing. A sewing machine is needed, but this is an ideal beginner project for kids. It's also quick to make and great as a gift if you include a pack of coloured pencils.
What you need:
- 12 coloured pencils, about 18cm
- calico or cotton fabric, about 30cm x 32cm
- cotton tape or ribbon, about 50cm
- thread
- tailor's chalk or pencil
- scissors
- pins
- sewing machine
Number of players:
1+
Activity:
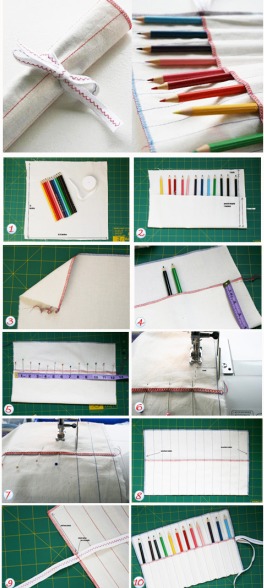
Step 1. Gather your materials to make the pencil roll. You can choose any mid- to heavy-weight fabric for this project. The pencils we used were 18cm long; if yours are longer or shorter read below to see how to adjust your measurements.
Step 2. Cut the fabric into a rectangular shape. Our measurements were 30cm x 32cm wide. You may need to change this measurement if you have more pencils or they are longer or shorter than the ones we used. When figuring out how much to cut, use this guide:
- Length = 2.5cm per pencil + an extra 1.5cm
- Height = finished height (pencil height + 2.5cm) + half the finished height
Step 3. Zig zag all around the edges or use pinking shears so the fabric doesn't fray (use an overlocker if you're lucky enough to have one). We used red and blue thread to add a bit of colour.
Step 4. Fold the bottom half of the material up and pin into place. You can use the pencils as a guide for spacing.
Step 5. Now mark with pins where you will stitch your lines to make the compartments for each pencil. We have allowed 2.5cm between each seam. You can reduce this if you want a snugger fit for each pencil. Start your measurements about 0.5cm from the left side. If you like you can mark your lines with tailor's chalk as a guide.
Step 6. Sew a nice straight line 2.5cm from the left side to use as a reference for your quilting guide (if you're using one). Set your quilt guide to 2.5cm and sew a line from the bottom to the top of the pencil roll. Remember to do a couple of back stitches at the start and end of each row so the stitches don't unravel.
Step 7. Continue sewing rows all the way to the end of the roll. The straighter your guide line, the straighter the stitched lines that follow will be.
Step 8. Trim the treads on your pencil roll. Zig zag or use the overlocker to finish the sides of the material as desired. Neaten the threads on the corners.
Step 9. For a bit of extra jazz for your pencil roll, zig zag down the length of tape with a contrasting thread colour.
Step 10. Find the centre of the length of the tape/ribbon. Stitch centre of the tape securely to the outside edge of the pencil roll, about halfway up the roll. Insert your pencils and you're done! Just roll up, tie a bow around with the tape/ribbon and bask in the loveliness of your creation.
This craft was created by Cintia Gonzalez-Pell, who blogs at my poppet.


Leave A Comment
You must be logged in to post a comment.