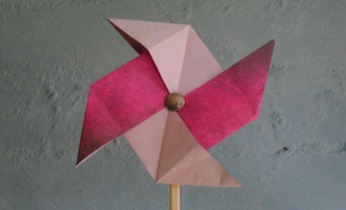
Origami windmill
With digital games making our kids more and more attuned to 'quick fix' entertainment, origami can be a rewarding way to help them improve their focus and attention to detail. This step by step video shows you how to make an origami windmill.
What you need:
- 1 x two-sided square of origami paper (approx 23cm x 23cm)
- 1 x wooden chopstick (disposable takeaway ones are ideal)
- 1 x drawing pin/tack
Number of players:
1
Activity:
Fold the square diagonally one way. Open it out and then fold it diagonally the other way.
Open it out again.
Using the fold marks as a guide, fold the lower left-hand corner to the centre mark and do the same with the upper right hand corner.
Turn the paper over. Sit it on the table at a 45 degree angle. Fold the left flap to the centre. Fold the right flap to the centre. (see video)
There will now be a tab at the bottom and one at the top. Fold both tabs behind.
You should now have a square shape with an alternate coloured square pattern. Turn it over.
Pull out the paper from the middle: squash fold each corner (see video) to make the windmill's wings.
Push the pin through the centre of the windmill and attach it to the chopstick.
Blow gently to make the windmill spin.
Still not sure? Just watch the video.
- Thanks to our sister company Kidspot Australia for creating the instructional video.


Leave A Comment
You must be logged in to post a comment.