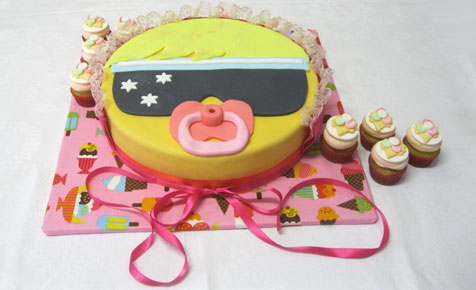
Moshi Monster Birthday Cake
Ingredients
Chocolate cake:
This can be made up to a month in advance and kept in the freezer.
- 350g butter, softened
- 325g sugar
- 3 cups self raising flour, sifted
- å_ cup cocoa
- 2 tsp baking powder
- 1 å_ cup sour cream
- 4 eggs
- 1 cup golden syrup
Chocolate buttercream:
- 300g butter, softened
- 500g icing sugar, sifted
- 60g melting chocolate
- 1 egg
Decorations:
- 41 cm square cake board, found in cake decorating stores
- 50cm fabric, I chose an ice-cream print
- Packing or wide sticky tape
- 700g white ready-made icing, also known as fondant icing
- Food colouring – orange, pink, blue, black, yellow
- Approximate weight of fondant for each colour: 425g orange, 80g black, 45g blue, 15g white, 85g yellow, 40g bright pink, 10g light pink
- 1 mt pink ribbon, 2.5cm width
- Pins to secure ribbon to cake
- Blue and yellow edible glitter, optional
To make the babyÛªs bib:
- Bright pink fabric 7 cm x 60cm
- 2 mt pink ribbon, 1 cm width
- 1 mt lace ribbon
- Pink cotton
Equipment and other items needed:
- 26cm round cake tin
- Greaseproof paper
- Serrated knife
- Pallet knife
- Small star or flower cutter
- Sewing machine
Approximate timings:
- To make the cake : 15 minutes preparation time, approximately 40 minutes cooking time
- Covering and decorating the cake: 2-3 hours all up ÛÒ this can be broken down into stages.
Method
1. Use buttercream between each cake layer and over top and sides 2. Cover with fondant icing 3. Draw sunglasses to size using baking paper
4. Create templates for the coloured fondant icing 5.Make the bonnet 6. Position the cut icing on the cake
7. Add the dummy 8. Make and decorate cupcakes if using 9. Add the ribbon and bonnet
Chocolate cake
Preheat oven to 200å¡C. Line tin with greaseproof paper.
Blend butter, cocoa, sugar, flour, baking powder, golden syrup, sour cream and eggs in a food processer or kitchen mixer and mix well. Pour into the tin and bake for 10 minutes; reduce heat to 180å¡C. and bake for another 30-40 minutes or when cake springs back when gently pressed.
Allow the sponge to cool in the tin for 5-10 minutes before turning over onto a cooling rack. At this point you can wrap well in cling film and freeze for up to one month.
Buttercream icing
Place all of the ingredients into a mixing bowl, mix on low until combined before turning on high speed.
Continue to beat on high until the mix is light and fluffy ÛÒ at least 5 minutes. Any left-over can be frozen.
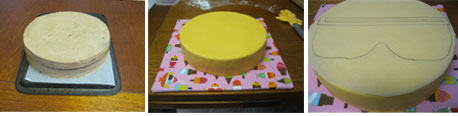
Cake assembly
Trim the top of the sponge to flatten out. If the sponge has dropped into the centre, use the trimmed sponge bits and fill the middle (add a little water to the trimmed sponge to create a putty like consistency) to make level.
Using a serrated knife, cut the sponge into three ÛÒ horizontally.
If the sponge feels dry, squeeze fresh orange juice onto the sponge ÛÒ this is optional but will guarantee a moist sponge.
Place the bottom layer of sponge (which was the top of the sponge) onto a large piece of greaseproof paper. Take a third of the butter cream and spread evenly over the sponge. Lay the middle sponge on top, repeat with another layer of butter cream before placing the top layer of sponge on top. (The top layer was originally the bottom).
Cover edges and top with remaining butter cream. Allow to set in fridge for approx 10 minutes.
Readymade white icing
This is also known as Û÷fondant icingÛª and can be found in larger quantities in cake specialty shops ÛÒ they also sell them already coloured if you donÛªt wish to do that yourself. It will keep for a long time if stored in a cool place (like the freezer) and if itÛªs wrapped very well (I usually use a few layers of cling film before placing in an airtight container).
Usually the icing is quite firm to touch when you open the packet. Break it into small pieces with your fingers and begin to Û÷workÛª or Û÷massageÛª it until you notice is becomes smoother and softer. At this point, bring the icing together and knead as you would a dough until it is soft and smooth (the smoothness reminds me of my kidsÛª baby bottoms!). Once itÛªs smooth and soft you are ready to add the colour.
Approximate weight of fondant for each colour: 425g orange, 80g black, 45g blue, 15g white, 85g yellow, 40g bright pink, 10g light pink.
Begin by covering the sponge with orange fondant icing.
Flatten the fondant a little, press some Û÷cratersÛª into the dough and add a few drops of colour. Going slowly but steady is better than adding too much at once (unless you are after a very bright colour!) until you have achieved the strength of colour you are after. To work the colour into the icing, continue kneading as you would a dough. If the icing starts to stick to the bench use icing sugar, as you would flour to dough.
Roll out the orange icing, using icing sugar to prevent sticking, until it is large enough to cover the sponge. Use the cake tin as a guide to ensure the edges will be covered.
Roll up into your rolling pin gently and transfer to the cake. Gently unravel over the cake, starting from the top until the icing is totally unravelled over the sponge.
Using a sharp knife or kitchen scissors, trim away any excess around the edges. Use a pallet knife to tuck under an excess. (donÛªt worry if the base of the icing is too short or not perfect as it will be covered later with ribbon).
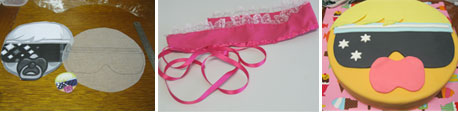
Next step is to transfer the stencil onto greaseproof paper using a texta.
Colour the remaining fondant according to the above weight recommendations and wrap each with cling film to stop them from drying out.
Make the sunglasses first by rolling out the black icing, lay the greaseproof paper on top and draw over the sunglasses with a rounded pen or pencil to mark out on the fondant. Use a sharp knife to cut out. Lay onto the iced cake.
Cut out the light blue and white strips, using the stencil, to make up the top of the sunglasses and position above the black icing.
Cut out white stars and position on one corner of the sunglasses.
Roll out yellow fondant, mark out the hair using the stencil and cut with a sharp knife. Position at the top of the cake and gently over the sunglasses to create a fringe.
Last piece is the dummy which is in three parts. Use the stencil to cut out the dark pink base and position onto cake. Make the ring by rolling out a short cylinder and using a chopstick to create a hole through the centre. Place in the centre of the dummy base.
Using the light pink, roll out a cylinder approx 13cm in length, with the centre thicker than the ends. Gently press the thicker centre part flatter than the ends before positioning around the ring.
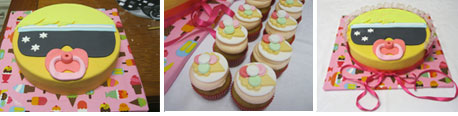
Dust hair with yellow edible glitter and the sunglasses with blue edible glitter (optional).
Once the cake is iced, keep in a dry place. DonÛªt place it in the fridge or anywhere moist as the fondant will go soft and gooey.
To make the baby bonnet
Cut the pink fabric into a strip 11cm x 57cm. Fold in half lengthways to create a strip 5cm x 57cm and fold in each end by 1cm and iron.
Straight stitch the edge of lace and pull thread gently to gather evenly.
Pin the lace onto the length of fabric so that it sits up – sew.
Position the ribbon on the other length of fabric, ensuring the ribbon is positioned so the ends are even and sew.
To dress the cake board
Lay the fabric printed side down on an even bench and lay the cake board in the centre.
Using wide tape, secure each edge, working opposite ends first to ensure the fabric remains tight.
To assemble
Once the cake has chilled and the buttercream is set, gently place on the fabric cake board.
Ice the cake as per instructions above.
Use the pink ribbon (2.5cm width) to wrap around the base of the sponge and secure with a pin.
Position the bonnet around the top of the cake and tie at the base with a bow.
Notes:
- IÛªm not very good at drawing so I googled images of Lady Goo Goo and printed one off. Then I enlarged the image so that it was the same as the size of the cake and used this as my stencil.
- My kids love playing one of the games on Moshi Monsters which involves running an ice cream stand and making different types of combinations of ice creams in exchange for gems, which explains is why I have used the ice cream fabric and ice cream cone cupcakes!
- I am not a prolific sewer and found the bonnet quite easy and quick to do. If you donÛªt have a sewing machine or have run out of time, use a paper doyley instead and glue onto the ribbon.
- This recipe was created for Kidspot by Chef Sonia.
From Chef Sonia
Once the cake is iced with the fondant icing the sponge is protected and therefore wonÛªt dry out so you can organise each stage ahead of time, according to how much time you have. I understand that time is precious ÛÒ I have two young children of my own, run my own business and have a husband who works split shifts! IÛªve found the more organised you are the less stressful the process is. A suggested work plan may look something like this:
- Buy all ingredients – dated one month before party date
- Make bonnet – anytime within this month
- Bake cake and cut into three – one day the week of buying the grocery items ÛÒ if done at this time, wrap well and freeze
- Prepare buttercream and spread onto cake – you can keep in fridge at this point, if you have room, for a couple of days so have a target to complete this stage 8-9 days prior to party
- Ice the cake with orange fondant icing – 6-8 days prior to party
- Colour and cut out remaining fondant icing – 2-8 days prior to party
- Put together, finish cake – 1-2 days prior to party
Although I am a qualified chef, IÛªve had no formal cake making training. What I have learned is through trial and many errors. I hope that by sharing my knowledge, you can become as confident and as excited about cake making as I am! (without the mistakes!). I think the most important thing is to Û÷give it a go,Ûª youÛªll be producing amazing cakes before you know it!


Leave A Comment
You must be logged in to post a comment.