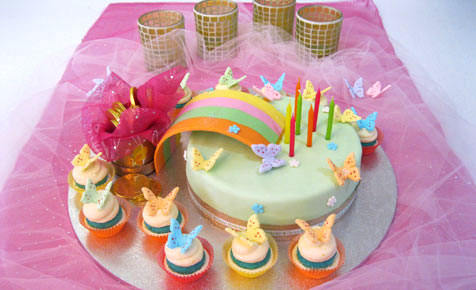
Over the Rainbow cake
Ingredients:
Butter cake:
This can be made up to a month in advance and kept in the freezer.
- 250g butter, softened
- 1 tsp vanilla essence
- 230g caster sugar
- 4 eggs
- 450g self raising flour, sifted
- 250ml milk
- Food colour ÛÒ blue and pink
- 1 orange juice of (optional)
Orange buttercream icing:
This can be made up to two months in advance and kept in the freezer or made fresh and frozen for next time. If orange is not a popular flavour substitute it with vanilla.
- 200g icing sugar, sifted
- 150g butter, softened
- 1 orange, zest and juice
Decorations:
- 45cm round cake board
- 700g readymade white icing (also called fondant icing, you can find Orchard white icing at all major supermarkets)
- 500g approximately for covering the cake and the remaining 200g for the rainbow and other decorations
- Icing sugar, extra to prevent white icing from sticking to the bench when rolling
- Food colouring ÛÒ green, pink, blue, yellow and orange
- 50cm gold ribbon ÛÒ 2-3cm wide
- 50cm Happy Birthday ribbon (usually sold in a 4mt roll, can be used for another birthday!)
- Cardboard craft box with lid, decorated with stickers (you can also find decorated boxes at $2 stores)
- 25cm fabric, anything pink and sparkly!
- Gold chocolate coins
- 12 small cupcakes cases
- 1 pkt fondant butterflies and small fondant daisy flowers (see stockist below)
- Blue edible glitter, optional
- Candles
Equipment and other items needed:
- Greaseproof paper
- Pallet knife to spread the butter cream
- Small cupcake tin, optional but I find the cupcakes bake more evenly
- Small round cake tin approx 15cm in diameter to rest the rainbow to dry
- Piping bag and 1cm round nozzle
Approximate timings:
- To make the cake and cupcakes: 20 minutes preparation time, approximately 18-45 minutes cooking time
- Buttercream icing: 5 minutes to make, 10-15 minutes to cover sponge
- Icing the cake: approx 30 minutes to 1 hour. Allow more time if you are doing this for the first time ÛÒ you will have a much better end result if youÛªre not rushing (trust me on this one!)
- Rainbow decoration: allow 30 minutes.
- Decorating the cupcakes: approx 15 minutes depending how fast you are with a piping bag! If you donÛªt have a piping bag, spread over the top of cupcakes with a smooth edged knife.
- Finishing up the cake with ribbon and decorations: allow one hour
Method:

1. Roll coloured fondant into four equal sized balls 2 Use a rolling pin to roll the balls lengthwise into a strip. 3. Drape over a tin to give it a curve and completely leave to dry for 7-10 days.

4. Cover the cake with fondant icing 5. Attach both ribbons to cake 6. Gently attach the rainbow to the cake using buttercream to fix it in place.

7. Remove cupcakes from paper. Pipe buttercream in paper, add cake and pipe more buttercream on top 8. Add fondant butterflies 9. Stamp out flowers from fondant and add to cake
Butter cakePreheat oven to 175å¡C.
Line tin with greaseproof paper and place cupcake cases in cupcake tin.
Cream together butter, vanilla and sugar until light and fluffy; slowly add in eggs one at a time.
Fold in flour and milk in two stages, donÛªt over mix.
Spread one third of the cake mix into the cake tin.
Split the remaining mix into two, colour one with blue and the other with pink, gently folding through the colour.
Fill cupcake cases to half way point.
Layer remaining mix evenly into the cake tin.
Bake in oven until the mix springs back when gently pressed or when a skewer comes out clean.
The cupcakes will take approx 8-10 minutes, the sponge approx 35-45 minutes.
Keep the sponge in the tin for approx 5 minutes before turning onto a wire rack ÛÒ keep the bottom side up at all times to avoid making lines as this will be the presentation side up. You can freeze your sponge and cupcakes at this point, tightly in cling film.
When the cake is totally cooled (best if you can keep it in the fridge to chill right down before going any further) you will need to flatten the Û÷bottomÛª (which was the top.) Place a sheet of greaseproof paper on the presentation side and turn over. Use a serrated knife and cut the top of the cake so itÛªs as flat as possible. I usually cut a little at a time so that I donÛªt accidently cut away too much cake!
To guarantee a moist cake, squeeze an orange over the sponge and allow the juice to soak through before spreading on the butter cream. (this is optional)
Buttercream icingPlace all of the ingredients into a mixing bowl, mix on low until combined before turning on high speed.
Continue to beat on high until the mix is light and fluffy ÛÒ at least 5 – 10 minutes. Any left-over can be frozen.
Using a small pallet knife or smooth edged knife, spread the butter cream around the cake as evenly as possible. The trick is to have it as smooth as possible as the icing will show any bumps and lumps but donÛªt despair if itÛªs not perfectly even (mine usually arenÛªt) as the decorations will be used to hide these.
Readymade white icingThis is also known as Û÷fondant icingÛª and can be found in larger quantities in cake specialty shops ÛÒ they also sell them already coloured if you donÛªt wish to do that yourself. It will keep for a long time if stored in the freezer and if itÛªs wrapped very well (I usually use a few layers of cling film before placing in an airtight container)
Fondant rainbowUsually the icing is quite firm to touch when you open the packet. Break it into small pieces with your fingers and begin to Û÷workÛª or Û÷massageÛª it until you notice is becomes smoother and softer. At this point, bring the icing together and knead as you would a dough until it is soft and smooth (the smoothness reminds me of my kidsÛª baby bottoms!) Once itÛªs smooth and soft you are ready to add the colour.
You will need to use 200g of the fondant icing for the rainbow. Split this evenly into four and colour each ball with one of the following ÛÒ pink, orange, yellow and green. To do this, flatten a little, press some Û÷cratersÛª into the dough and add a few drops of colour at one time. (I use a toothpick or end of a sharp knife) Slowly but steady is better than adding too much at once (unless you are after a very bright colour!) until you have achieved the strength of colour you are after. To work the colour into the icing, continue kneading as you would a dough. If the icing starts to stick to the bench use icing sugar, as you would flour to dough.
Once all four balls are ready, roll them into even sized balls and place them side by side on a piece of greaseproof paper, which has been cut in a piece 8cm x 20cm, and gently roll flat with a rolling pin, rolling lengthways only, until the fondant is just under 1cm in thickness. The length should be approx 15 ÛÒ 18 cm. Keep in mind, the longer the rainbow the higher probability it will break ÛÒ short and stocky is the way to go here to avoid any disasters (if the rainbow does break use some butter cream to join back together ÛÒ the best time to do this is when you are assembling the cake so the rainbow isnÛªt moved. Yes, it has happened to me!!) Trim the edges with a sharp knife so they are straight and lay the rainbow, with the greaseproof paper, over a 15cm round cake tin. Keep in a cool, dry place ÛÒ I have a high pantry which is perfect as the kids canÛªt reach! And to avoid the tin from rolling, weigh down by placing a bag of rice or flour inside the tin. This will need at least 10 days of drying time ÛÒ the longer the time, the less likely it will break as the fondant dries quite hard.
Use any left-over fondant for decorating the cake and cupcakes.
Covering the cake with fondant icingColour the remaining white fondant with green and knead until the colour is fully incorporated. Roll out to approximately 1/2cm thickness and wide enough to allow overhang ÛÒ use your baking tin as a guide. It can be easier to roll out on greaseproof paper ÛÒ donÛªt forget to use icing sugar if it starts to stick. Use your rolling pin gently and turn the icing regularly so that the bottom wonÛªt stick.
Using your rolling pin, and starting closest to your body, loosely roll the icing into the rolling pin. Û÷UnravelÛª the icing over the cake, making sure you allow enough icing to fall over the edges. This is the trickiest part of the whole process so the less kiddies around at this stage will probably make things easier. DonÛªt stress if it looks a mess, icing can be smoothed over and the ribbon and decorations will work their magic to hide the bits you donÛªt want anyone to see. Also use the natural curves of your hand and fingers to manipulate the icing so that it sits smoothly on the cake. Touch the icing to the cake gently ÛÒ if you press to hard you will make finger holes in the cake.
Using kitchen scissors or a sharp knife, cut around any excess icing from the bottom so that it has an overlap of around 2-3cm.
Put a sheet of greaseproof paper on the top of the cake and gently turn over to expose the bottom. Fold in the icing overlap so that the edges are all sealed. If you have any cake spots exposed use the excess pieces of icing to cover. To seal them, run your finger over the joins a few times (gently!) and they will stick together. This is also your last chance to make any adjustments if the cakeÛªs not sitting evenly ÛÒ either use the sponge which youÛªd cut off previously or a piece of icing.
Turn the cake over onto your serving plate or cake board. Remember to position your cake so that the best side will be showing out and the side which may not be quite so beautiful will be hidden by the rainbow and treasure box.
Tightly wrap any left-over fondant and keep in the freezer for next time.
Decorating the cupcakesKeep 3 tbsp of butter cream to one side to use as Û÷glueÛª before piping onto the cupcakes. When I baked mine they came away from the paper (and didnÛªt look appealing at all!) so I piped a little butter cream into the base of fresh cupcake cases (to secure the cupcake sponge), popped the sponge on top and piped more butter cream on top. If you are making these ahead of time keep them in a sealed container in the fridge at this stage and finish with the butterflies just before serving (the butterflies will go soft otherwise).
To decorate and finish the cakeWrap the gold ribbon around the base of the cake and secure with a pin. Repeat this process with the happy birthday ribbon.
Fill the treasure box with fabric and gold chocolate coins, position onto the cake board. Û÷GlueÛª with a teaspoon of butter cream to avoid movement.
Gently position the rainbow to rest at the base of the treasure box and on top of the sponge. Use butter cream to attach the top of the rainbow to the cake ÛÒ smooth away any excess butter cream with the tip of your finger.
If you have your own flower cutters, use any left-over fondant to cut out. Allow to sit for 15 minutes (for easier handling) before gluing onto cake with butter cream.
Arrange butterflies around cake and secure with butter cream.
Dust with edible glitter.
Position candles on top of cake. ItÛªs important to keep the finished cake at room temp in a dry cool place not the fridge!
Notes:
- I usually make cupcakes if I have some cake mix left over so if you prefer, cut down the quantity of cake mix or use a larger cake tin if you would prefer not to have any.
- Icing the cake is the trickiest part ÛÒ I would recommend a time when itÛªs quiet and you donÛªt need to rush (I know that doesnÛªt happen very often with us mums!) and once the cake has been iced all around with fondant icing, this acts as cling film and stops the cake from drying out. You can do this stage ahead of time by at least one to two weeks ÛÒ depending on the weather. (and keep the iced cake in a dry place ÛÒ not the fridge or the fondant icing will start to break down and go gooey) DonÛªt worry if it doesnÛªt look perfect as the decorations will hide any imperfections!
- This recipe was created by Sonia Anthony.
From Chef Sonia
Although I am a qualified chef, IÛªve had no formal cake making training. What I have learned is through trial and many errors. I hope that by sharing my knowledge, you can become as confident and as excited about cake making as I am! (without the mistakes!). I think the most important thing is to Û÷give it a go,Ûª youÛªll be producing amazing cakes before you know it!





Leave A Comment
You must be logged in to post a comment.